The Loose-Item Trap in a Building Photo
Building photos are easier to interpret when you record what is in the frame, what is hidden and how the view was made, improving later comparisons.
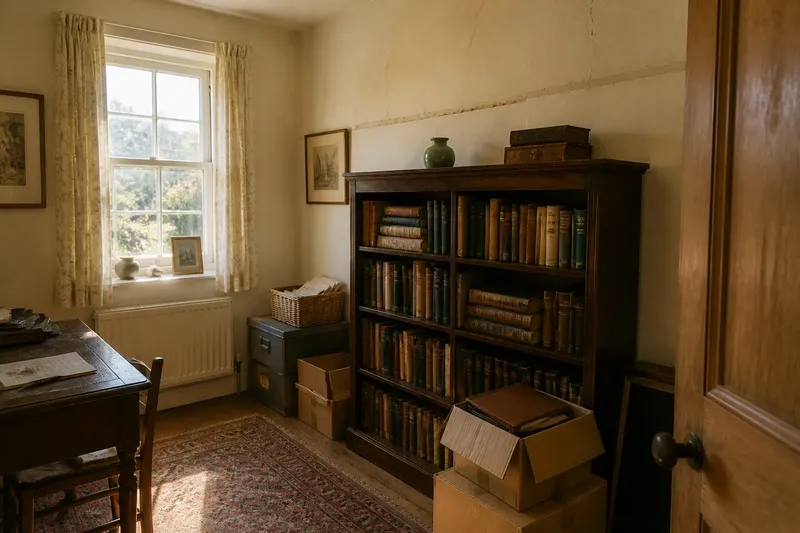
The most common mistake with a building photo is treating a clear-looking frame as a complete record. A chair, stored box or open door can hide the very part you need to understand later, while a close crop can leave its location uncertain. The result is not just a weaker image: it can send a future viewer looking in the wrong place.
Instead of trying to make a room look tidy for the camera, document how it is actually arranged. The aim is to make the limits of each image visible, so someone reviewing it can tell what the photograph includes and what it leaves out.
Show the obstruction
Begin with a view that locates the area: include a doorway, window, corner or other recognisable feature. If furniture or stored items block the surface, keep them in the frame and note what they obscure. A second image can show the visible detail more closely, but it should not imply that the hidden area was examined.
Think of a photo as a labelled parcel: the outside tells you where it belongs, while the contents show the detail. A tight crop may preserve the detail and lose the location; a wide view may do the reverse. Taken together, the two views can make each other more useful.
Keep the room honest
Do not shift heavy furniture, stack stored belongings elsewhere or reach behind appliances just to improve a photograph. Those actions can create access or safety risks and may alter the scene you meant to record. If an area is blocked, say so plainly and leave any closer examination to someone appropriately qualified when access or significance is uncertain.
For each image, make a brief note of the room or elevation, the direction you faced, the obstruction and the lighting. Use a consistent file name that identifies the location and date, and retain the original if you make a cropped copy for easier viewing.
Make comparisons fair
Before comparing two images, check whether they show the same part of the building and a broadly similar arrangement. Furniture moved, a door left open, a different camera height or strong sunlight can change what is visible without showing a change in the building fabric.
If the views differ, record the difference rather than forcing a conclusion. For instance, note that a cabinet covers the lower wall in one image but not the other. That distinction helps a later reader separate a change in access from a change in appearance.
What should a photo note say?
What if an item hides the feature?
Name the item and describe the part it blocks, such as “wardrobe covers the lower corner beside the window”. If the area later becomes visible without moving anything unsafely, take a separate image and identify the changed view.
Should I move furniture for a clearer image?
Usually, keep the scene as found and record the obstruction. If an item can be moved safely and with permission, retain a view before and after, noting that the arrangement changed.
How do I compare different room layouts?
Use fixed features such as a window edge or doorway to orient each image, then note what furniture or stored items changed position. If those differences make the relevant surface impossible to compare, record a new view instead of treating the images as equivalent.
What if the hidden area matters?
A photograph cannot show behind an obstruction. Do not infer the condition of the concealed surface; ask a suitably qualified building professional to advise if its condition has practical significance or access is not straightforward.
A worked room record
Say you find a bookcase partly in front of a wall beside a window and want to record a visible line above it. First, take a wider image that includes the window, wall and bookcase; then take a closer image of the visible line without moving the case. In your note, write that the bookcase covers the lower wall and that the line is visible above it. The resulting record shows where the feature sits while making clear that the covered area remains unknown.
Check before filing
- Location: Check that a window, doorway or corner identifies the area; if none is recognisable, add a wider view, otherwise file the image with that landmark in its note.
- Obstruction: Check whether furniture or stored items hide any surface; if they do, name what is hidden and avoid claiming it was inspected, otherwise note that no obvious obstruction is visible.
- Arrangement: Check whether items have moved since an earlier image; if they have, record the changed layout and compare only visible areas, otherwise proceed with a cautious like-for-like comparison.
- Lighting: Check for glare, deep shadow or direct sunlight; if these mask detail, take another view in softer light, otherwise retain the image and note the conditions.
- Original file: Check whether the image has been cropped or adjusted; if it has, keep the original and label the edited copy, otherwise file the unedited image.
- File name: Check that the name identifies the building area and date; if it does not, rename it before filing, otherwise keep the existing clear name.
A building photo is most useful when it is candid about its blind spots. The next time you record a room, include the object that interrupts the view and name what it hides; that small detail can prevent a later reader from mistaking an unexamined patch for a documented one.